Tuesday, January 29, 2013

Historic House Winter Upkeep 101


For those of us that live in old houses, performing basic maintenance and upkeep can prevent potentially more serious problems and keep your home running efficiently.  During the winter, energy efficiency and proper maintenance is especially important with sensitivity to its historic character-defining features.


Below are some tips for winter upkeep in your historic house:

1. If you must add insulation, add it to the attic and the basement, where most of the house's heat escapes. (Adding blown-in insulation to walls can cause problems in the long run for historic houses).

2. Have your furnace system serviced regularly to make sure it is working efficiently. Change your furnace filters. Bleed radiators and clean forced-air registers.

3. Install a programmable thermostat to save on heating costs when you are not home.

4. Insulate pipes and duct work.

5. Weatherstrip and caulk windows to prevent any air leaks. Repair windows that are not functioning or closing properly. Make sure they are locked tight.

6. Close fireplace flues or dampers when not in use.

7. If windows are proving to be a problem in heat loss, consider adding energy efficient storm windows, which can be just as effective as replacing with new window sashes. Additionally, you can receive a $1,500 tax credit.

8. Use heavy drapes or shutters to keep additional heat from escaping from your windows.

9. Inspect your doors for gaps where air can escape, and seal or fill any holes/gaps. 

10. Use a roof rake to remove snow and ice from your roof.

11. Consider getting an energy audit.


Hopefully these tips are helpful to you! Remember, always retain first, then repair, and if you must replace, replace in-kind. Stay warm, friends!


Saturday, January 26, 2013

Guest Room Sneak Peek


I have been working on the guest room now for quite some time and today I thought I'd show you a little peek:


I hope to share the details with you very soon!  Additionally, I am excited to be featured today at Eclectically Vintage. Please visit Kelly's blog and check it out!


As always, I really enjoy getting to meet and know my followers- your comments always brighten my day.  Thank you so much for reading and for your friendships!


Friday, January 25, 2013

The Guest Room

I'm excited to show you our guest room today. It has been a challenge to decorate this room. We've been in this house for over  three years now and I'm just now getting this room put together.


Before it was a hodgepodge of stuff, with no color palette or feel defining the room. This room to me is difficult due to the projection in the middle of one wall where a fireplace used to be, and a recess along that same wall. It's one lonely window also makes it odd in my mind. One of the first changes that I made was to paint the room from a pastel yellow to more of a neutral cream color. In hindsight I wish now I had painted it stark white for a crisper look.


Next I decided I wanted to spray paint our white iron bed red for a bold look against the white bedding. I draped my husband BJ's great-grandmother's quilt overtop. The room morphed into sort of a farmhouse-y look.


I seem to act very impulsively when it comes to decorating.....does anyone else have this problem?

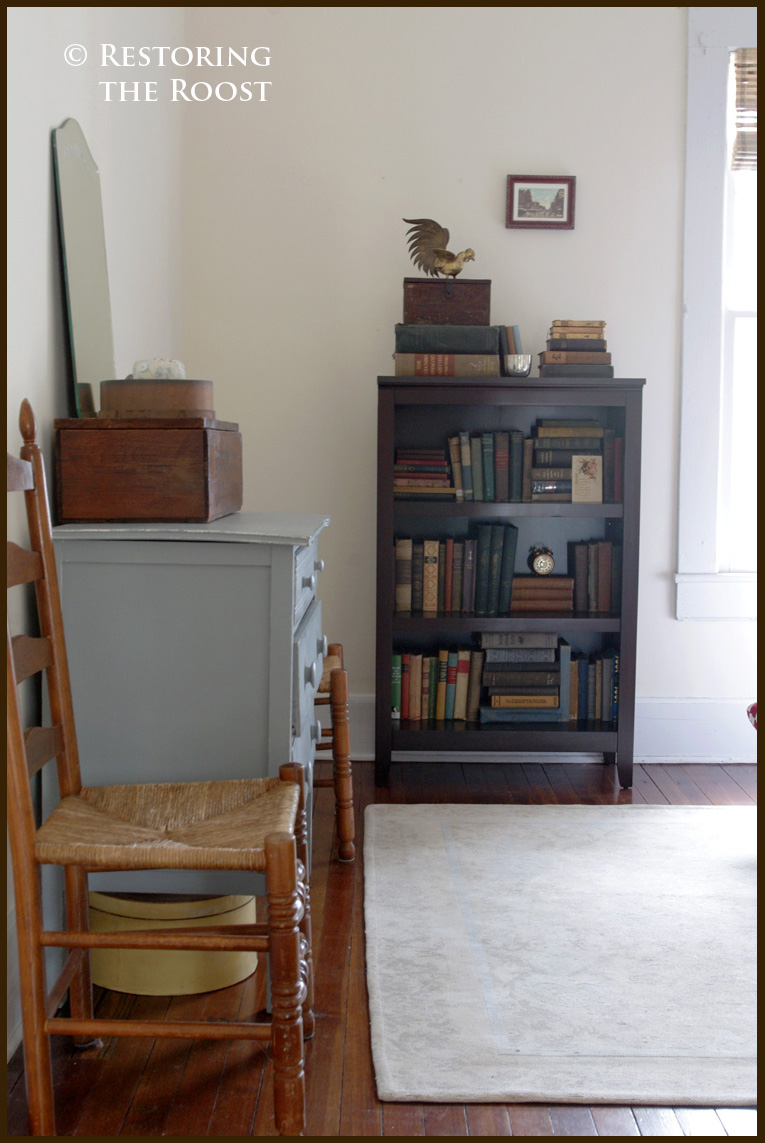
Over time this room seemed to morph into the "chicken" room. I had chicken paintings, prints, signs, and other memorabilia, chicken figurines......oh dear. This was NOT the look I was going for to give guests a relaxing, inviting room in which to stay. I decided I needed to get rid of our large, solid wood drafting table (a nice piece, but not functional for us anymore) and most of the chicken clutter. I moved a bookshelf with all of my antique books into this room instead.


 I painted the yard-sale dresser from its crusty (not pretty) white to a color with more pop. This subtle gray-blue worked well and is not unlike the color on the wooden filing cabinet used on the far side of the bed. I topped the dresser this with an antique ammunition box that has a wonderful patina; a vintage sewing kit completes the trio.


The next new piece introduced to the room was my cherry side table detailed in this post. It makes a wonderful bedside table and gives some rich color against the light walls. It may not stay in this room, but for now it works. I placed a jug for water and a glass on a tray along with some fresh lavender sprigs for guests staying the night.


This is the guest room shortly after we moved in:


Here is the room now:


A bamboo roman shade dresses up the lone window a bit. Then it was time to embellish the walls: an antique tobacco basket defines the bed, along with some prints, a breadboard made from an old bourbon barrel, and a mirror.

We also have a luggage rack tucked away for when guests come that we can pull out for their use. I like this one with its metal frame and thick burlap panels (a recent Christmas gift).


Now for the part of the room that doesn't quite fit and for me is too cluttered. I didn't want to show you this part, but that wouldn't really be fair now, would it?

Add caption

Currently this room has to do double-duty and also function as a space for BJ's music-related items including his keyboard, guitars, music books, and other items. I wish it could function as solely a room for guests and their relaxation, but that is just not possible at this time. So, one wall and cubby is devoted to musical pursuits. BJ has been patiently waiting for his "man room" all to himself......maybe someday soon, honey :) 
Add caption


The cool thing is that he was able to easily build shelving in this nook to accommodate his books, musical supplies, art, and other random items that were taking up precious closet space elsewhere. It may not match the rest of the room, but at least the space is being used. This shelving cost us about $12 to build, having the paint and tools on hand already. I hope to post a tutorial soon on building this shelving--as it was so easy to do!


Add caption


So there you are! Our guest room.


Linking to:


Savvy Southern Style Wow Us Wednesdays


Monday, January 21, 2013

Missing Hen :( Predator-Proofing our Coop


We had a hen go missing recently :(  We came home one night and there were only 6 hens in the coop with Reggie. When she didn't appear the following night, and the chickens were acting particularly strange by not leaving their coop/pen to forage and frolic in the woods, we knew something was wrong.

A day or two later my husband went walking around the woods when it was light and found a couple of clumps of feathers--not a good sign. He found another little clump over by our neighbors yard. It seems that some sort of predator caught our hen and then carried her off somewhere, because we never found her body.


Why is it always the sweetest ones that get taken?


There is no guaranteed way to totally prevent predators from getting to your chickens, especially if you allow them to free range, but there are some things that you can do to make the casualties a little fewer. We know in the back of our minds we will probably lose one or two a year to predators, and that is because we would rather them be allowed out to free range getting healthy greens and bugs, rather than be relegated to the pen and coop all day. They live far happier lives and to me that is worth it.

So far, to secure our pen and coop and deter predators we have:

1) added a carabiner latch/hook to the back door (so raccoon hands can't undo the latches!),


2) surrounded the pen with a solar-powered electric fence,


3) topped the pen with netting,

4) placed an owl on top of a little stand to ward of hawks in our backyard,


5) raise Dominiques partly because of their feather patterning that blends in more with the landscape, making them less visible to predators,


6) Keep the chicken feed in a separate spot from where the chickens are

Additionally, you can:

7) Consider burying underground piping at the edges of the coop or pen to discourage predators from digging underneath in order to get inside. You can also bury hardware cloth several inches under the ground.

8) Build strong, sturdy walls of the coop and pen (use hardware cloth) and make sure the supports and strong as well so that they can't be torn apart by larger predators. 

9) Invest in a wildlife camera. These are not very expensive, and you can spot from the footage what comes around at night so that you will know how best to deal with the problem. Remember, everybody wants a chicken dinner! 

It is so important to take steps to keep your flock safe from predators as much as you can, and it is important that the chickens know and understand where their "safe spot" is. For ours, it is underneath their coop in their pen.

Honestly, as much as I have enjoyed raising our last batch of chicks by hand and love how they are so friendly with us, we can tell a strong difference in safety instincts between them and the ones that were raised by their mama hen. The ones raised by their mama hen around grown-up chickens are faster to run from predators and much more skittish with us, and I think can detect overhead predators as well as ground threats a little better. They are better foragers and have more "street sense" if you will.

the hen with the hurt foot/leg...notice that it is curled under. She is also molting :(

In other chicken news, we have a hen with a hurt leg/foot. I noticed her limping pretty badly over the weekend, so we isolated her into the brooder coop and pen. We aren't sure if anything is broken, but it doesn't feel like it. Perhaps she just sprained something and we are hoping in a week or two she will feel better. I put some crushed baby aspirin in her water and I'm going to give her vitamins and electrolytes. She also happens to be molting, poor baby :(


Tuesday, January 15, 2013

Winter Garden


Gardening in winter? Why, yes!

red or yellow onions

Normally we let our garden go fallow for the winter.....at least most of the beds. But since last year we had such an unseasonably warm winter and could have practically grown veggies all year long, we decided to try our hands at growing some cold-tolerant crops, along with our annual planting of garlic and onions.

garlic growing strong (this is the bed where half of it was destroyed by the chickens)

Just on a side note- we planted a couple beds full of garlic and onions, and one of them got completely torn up by the chickens :( They learned how to fly up on our back patio railing, and then down into the garden bed encapsulated with chicken wire to forage for bugs. SO FRUSTRATING!
Oh, and one of the beds that we had planned for broccoli and winter squash has now been claimed by the chickens as a dust bathing container....*sigh*......so much for that garden bed. One of these days I am going to learn which plants I can plant around the beds to discourage the buffet of plant sampling.

bed made of cut local bamboo (chickens have been dust bathing in it :( 

Anyway, enough of the chicken ramblings. This winter along with the garlic and onions we planted peas, more radishes, collards, kale, lettuce and other cold-hardy greens and root vegetables. We shall see if any of these actually do well (in the past they have not done so great). Our peas are not looking so good.

onions and turnips (I think?) in the background

the sprouts of kale or collards (can't remember which)

What usually happens with our root veggies is that the green tops grow nice and large, teasing us with what might be underneath, and then when they are pulled up the root is practically nothing! We add compost to the soil and everything. Anyone have tips for growing root vegetables in raised beds?

radishes

It is almost time to sow our seeds indoors! I'm getting excited--planting in early spring or late winter is always so refreshing and a hopeful start to the year :)


Saturday, January 12, 2013

Warming Winter Soups


mmm......I love a hearty bowl of soup during the winter. Soups are usually pretty easy (and cheap!) to make for a nice supper in the colder months.

Below is a sampling of soups we make often or have tried recently:


1.  Beef stew (made with leftovers from pot roast the day before)

We usually put our leftover pot roast (recipe found here) and juices into a large pot to simmer with additional water and seasonings, sometimes adding a few more vegetables and egg noodles.


2. Pinto Bean Soup

This is one we make often as long as we have a ham bone leftover from something. We just place the ham bone and dry beans in the crock pot, fill it up with water and season generously with salt. Let it cook all day and serve with cornbread- always hits the spot!

3. Potato and Leek soup

I found and made this great recipe from Our Neck of the Woods. Amazingly, it doesn't use any cream or milk, only water! It is very tasty.

4.  Hearty Chicken Noodle

This is one of my husbands favorites, and he makes a mean bowl of chicken noodle soup. We usually use homemade chicken broth and fresh herbs, so that we are getting that good nourishment that leeches out from the bones and innards of the chicken into the broth. We add carrots, celery, and organic shredded or chopped chicken to the broth, and egg noodles. It is the best thing when I'm feeling sick or don't have much of an appetite.

5. Classic Minestrone

I love this recipe from Martha Stewart. It packs in tons of veggies and is delicious, also a bit spicy. Great with Parmesan cheese sprinkled on top and a side of fresh crusty bread.

6. White Bean and Kale Soup

Another favorite of mine, this recipe uses a base of water, great northern or other type of white beans, garlic,   a little diced tomatoes, onions and seasonings, with kale added a little later in cooking. I like to add bacon sometimes for flavor and if the soup is too runny you can add flour or another thickening agent.


What are your favorite soups to make during the winter months?


Linking to:

Saturday, January 5, 2013

Ready for Homesteading!


For Christmas we were lucky to receive several homesteading-related items to assist me in my quest to live more self-sufficiently and make our diet more wholesome. It didn't hit me until after we returned home and were unpacking how many gifts were along the lines of this theme!

Here are some of our spoils:


A Berkey Water Filter, which can purify any type of water to render it drinkable, in case something happens and we no longer have access to ours (our water runs on electricity and is from our well). In the event of an emergency, we could gather water out of a nearby stream or the pond across the street, or rainwater, and the filter would make it drinkable.


A food dehydrator, which will come in handy during canning season for tomatoes, beans, and many other veggies. Dried vegetables will work nicely in soups and stews for winter.


A food saver, which is great for keeping meats and just about anything else fresh in the freezer for long periods of time.


Homesteading-related books and cookbooks  :)


Bogs!! I love these--awesome for gardening and very comfortable for tromping around our homestead--and stylish too :)


Canning supplies (we already having a pressure canner, but can always use new lids and supplies!)


Cinnamon-infused local honey, yum!

the pastry board has a lip on each end so it fits over the top of your counter and can be flipped over for a smooth top

A pastry board for baking fresh bread, pies and other baked goods, and....


Two cast-iron enamel cooking pans (or dutch ovens). We have already been using these and they are awesome :)


I do believe I'm ready for full-force homesteading, don't you?