Thursday, November 29, 2012

Dried Foods from the Garden


In preparation for winter's onset, I planned to dry some of our beans and legumes from the garden for eating later on. It is interesting how I am learning nature's seasonal cycles in terms of food preservation and the how our diet naturally changes with the seasons.

Remember my post on shuck beans? Well, I began drying small batches strung up with thread in my entryway, and prior to Thanksgiving they were all dried out and ready for cooking:

shuck beans dried and still strung together

My shuck beans aren't that great looking-- I think partly because I either picked them too early on and did not let the pods fully mature, or I didn't have the right kind of bean. Either way, we tried a batch for Thanksgiving and I'm going to try another batch for a special dinner sometime in January or February. They actually turned out pretty good after simmering all day!

rather sad-looking shuck beans

I also dried all my southern peas this year. I plan to soak them before using and toss them in with some other dried bean varieties, onion, and some sort of fat or bacon to stew for hours on the stove on a cold winter day.

dried southern peas- I stored them in a breathable burlap bag after harvesting so that they could fully dry out


dried southern peas

I am in love with roasted pumpkin seeds, and we happen to have tons of them from all our decorative pumpkins that graced our steps in October. To roast and dry, simply toss with olive oil and seasoned salt and pop in a 350 degree oven for about half an hour.

Another thing we tried a few weeks back were home-made apple chips from fresh local apples grown here in North Carolina. Although not from our garden, at least they were grown in our state! They were easy to make and extremely addicting. To make them, slice the apples thin with a mandoline if you have one, sprinkle with cinnamon sugar and bake on a low temperature for about a half an hour or so on each side until apple slices are dried into chips.

homemade apple chips


Have you saved and dried any foods from your garden to enjoy this winter?


Linking to:

Monday, November 26, 2012

Breeding My Flock: Part 2


Today we had our chickens NPIP certified!

The NPIP program stands for the National Poultry Improvement Plan and is recommended for all breeding flocks. State agriculture employees will come out to your farm or house and test your flock for several diseases, including Pullorum, Avian Influenza, salmonella, and others on-site.  Here in North Carolina, it only costs a whopping $5 for your flock to be tested as long as you have fewer than 50 birds!

The lady who came to do the NPIP testing swabbed the mouths and drew blood from each of my little flock of 9 Dominiques. Poor babies!  It was very quick though, and before they had much time to protest they were released and set free to forage. They also each received metal leg bands. Of course, Rosemary was her usual pouty and mean self, throwing the biggest hissy fit of them all screaming her head off while the NPIP lady tested her. Way to set an example for the younger girls, Rosemary. 


With NPIP certification, we can show our chickens at any show without having to do testing or vaccinations immediately before the show, and we don't have to worry about passing on diseases to others if we plan to sell offspring from our breeding program.

Breeding your flock of chickens requires planning, attention to detail, and persistence. It is not something you want to let naturally happen and get out of hand if you are trying to maintain a particular breed standard. You must decide to either cull or not breed the birds that have flaws or defects that you don't want passed on to future generations. If you missed my first post on breeding, click here.

For us, that means choosing our top 3 or 4 hens that we will let mate with each rooster, only because although one of the roosters has a better comb, the other has lighter feathering (better for future pullets) and a less-crooked and longer tail. We plan to put these 3 or 4 pullets into the breeding pen for a couple of days at a time with each rooster. Hopefully this will produce enough fertilized eggs for us to put together for a successful hatch.

A potential chicken Christmas card photo- what do you think? 

The most controlled way to breed is to use an incubator, but I'm a sucker for watching mama hens raise their babies, so I will probably place these eggs in the nest box, mark them with a sharpie, and wait until one of our hens decides to go broody. I will collect the new eggs laid on top of the batch we want to hatch out (they will be the ones that are unmarked). Once a hen decides to "sit tight," on her nest, it takes about three weeks for the babies to hatch!

Stay tuned for Part 3 of the Breeding My Flock series where I will *try* my best to discuss how genetics plays into poultry breeding.


Linking to:

Saturday, November 17, 2012

Thanksgiving Table 2012


It's almost here, folks! Can you believe Thanksgiving is just days away?


Here at the Roost, we don't have a large family Thanksgiving dinner because we always travel to Kentucky to spend the Holidays with our families (which are quite large!). However, that doesn't keep me from setting a pretty table and inviting a few friends over for a 'pre-Thanksgiving' or an in between Holiday meal.


I love decorating the table for Thanksgiving--it is such an important, symbolic meal where we can gather and reflect on all that we are grateful for. If you missed my Thanksgiving table from last year, you can see it here.


This year, I used the same brown transferware, but layered it on top of our good china. I placed napkins with the world "thankful" embroidered on them on top of the plates, and then spray-painted the mini pumpkins we grew in our garden silver for some sparkle and a little take-home favor.


In the center of the table I placed a breadboard that was made from the side of an old Buffalo Trace bourbon barrel, and topped it with an heirloom white pumpkin, an artichoke and another silver mini pumpkin. Since I was sort of on a silver theme with the pumpkins, I pulled our our silver julep cups and placed artichokes in them. I was just playing around with the candlesticks and the artichokes--and realized they actually could work as a candle holder. Pull apart the center leaves, burrow the candlestick down in the artichoke, and you're done! So simple.


And remember that chocolate brown and cream traditional overshot coverlet I bought from the Appalachian Craft Guild shop while in Asheville? Well, I used that as a festive tablecloth, and added a burlap table runner down the center.


An few ears of Indian corn hang from my china cabinet for a festive fall touch. I think I'm going to add another maybe on the window and one hanging from the fireplace.


The best part of all was that I didn't have to buy anything additional that won't get used up or isn't functional in some way. I literally had everything I used for the decor already here in my house except for the tall candles, silver spray paint, and the artichokes (which will get eaten one night this week).

I hope everyone has a lovely Thanksgiving this week. Despite the hard year my husband and I have had, I am extremely grateful for SO many things. I'm especially thankful for complete healing of my broken leg (tibia fracture) without needing surgery, due to a car accident that occurred almost exactly one year ago. Those were long, dark days full of anxiety, trauma, and thoughts of whether I would ever walk normally again.....but I am happy to report that with patience and persistence I have resumed all my normal (even high impact) physical activities :) God IS faithful!


Linking to:


Thursday, November 15, 2012

Preparedness- are we ready?


In light of the aftermath of Hurricane Sandy and the nor'easter on Sandy's heels, it really got me thinking about how truly prepared we were to face a natural disaster that could leave us without power for days or weeks.

In all our efforts to live sustainably and self-sufficiently from our own land, I'm not sure my family has truly examined our level of preparedness if something were to occur in our region. Sure, we have canned food and extra water, but we haven't stockpiled necessities like batteries, flash lights, gasoline, and other essentials. And what we do have we certainly don't have enough of to last several weeks.

some of our canned food rations in our pantry

A few advantages to our ability to survive on our own would be that we have working fireplaces and firewood stocked up that could supply heat if our heating system failed, we have a battery powered radio set up and ready to go, and as long as our chickens are here with us and fed, we could live off our garden, wild greens and other forest edibles, and the hens' eggs/meat for quite a while.


With that said, I'm taking some steps now to prepare an emergency box or case with several needed items corralled together all in one place.

Our list of emergency supplies will include:

-Berkey Water Filter (this can turn any type of water into potable drinking water)
-flash lights, batteries, candles and matches
-a supply of seasoned firewood
-gasoline
-non-perishable canned food and water, manual can opener
-blankets and/or sleeping bags
-plastic tent or other protective covering
-sanitation and first aid supplies
-toilet paper
-knife and shotgun
-paper and pencil
-cooking oil
-aluminum foil
-garbage bags
-tools
-basic baking/cooking supplies
-salt
-fishing supplies
-duct tape
-baking soda and white vinegar (can be used for so many things)
-small safe with important documents
-survival guide book


I'm sure there is so much more I could add to this list. Every so many months, we will try to use up what is in our emergency kit in terms of food and resupply it. We also plan on investing in a generator. Although expensive, a generator is something we could desperately need since our water runs on electricity.

We have most of these things in the house already, but the difficulty is having them grouped together in a way that would be easy to grab and go if our house were to become damaged or uninhabitable.

So, what about you? Do you have an emergency disaster kit already prepared? I'd love to hear your suggestions of other items that would be important to add to this list!


Monday, November 12, 2012

Turkey Coop Progress


What's that you say?? Yes, friends, you read it right: WE ARE GETTING TURKEYS!!!!

I am so excited to be adding some new animals to our little homestead in the early spring. We are choosing a heritage breed, called Bourbon Reds, to raise primarily for meat. Not sure how they will interact with the chickens, but hopefully everyone will learn to get along :) 

image source, attribution

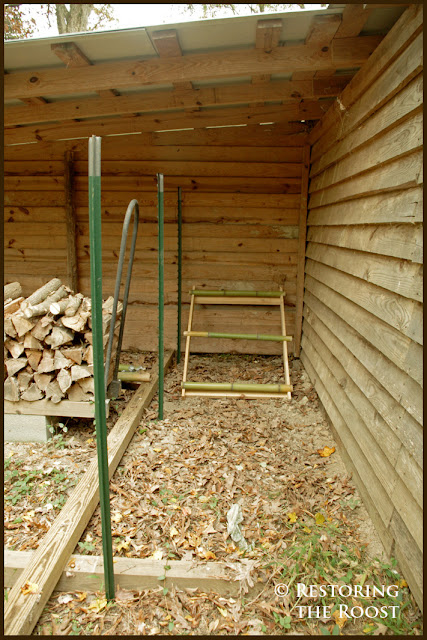
We are planning to use the partially enclosed, partially open area behind our shed for the turkey pen. We will enclose this area with poultry wire, and we've made a roost for them to sleep on that is underneath the sheltered portion of the back of the shed. We plan to keep the poults here in the pen for the first several weeks until they learn where home is, and then we will let them out to free range. I have heard from many turkey owners that turkeys are just as happy to sleep every night roosting up in trees.

poultry wire will be applied to the metal posts


The back of our shed is partially sheltered--perfect for the turkeys to sleep under


home-made turkey roost out of bamboo

I expect the turkeys to spend most of their time out in the woods that surround our property, and we will just pray they won't all get eaten by predators!

turkey coop looking out-- see the chickens in the background? They will have to learn to share their foraging space!

Once next November rolls around, they should be quite large and ready for processing. We plan to dress one out for Thanksgiving and one for Christmas :) If we are lucky we might have an extra breeding pair we can use for next year! Did you know that something like 98% of all turkeys in the United States are artificially inseminated? Apparently over the years we have nearly bred the natural mating and reproduction process out of these birds, who rarely get to reach one full year in their life-span.

 I guess it's time to stock up on the turkey poult feed before the prices shoot up. Do any of you raise turkeys? How different do you find them from chickens?


Linking to:


Thursday, November 8, 2012

What both the Preservation and Homesteading Movements Have in Common


Hello, friends! I first just want to welcome all my new followers- I'm so excited to get to know you and am humbled that you are interested in my musings here at the Roost :)

Oh, and this is totally off the subject, but recently I found Rosemary (our old, ruthless hen who is desperately trying to maintain her top pecking order spot) trying to lay an egg underneath the old church pew bench on our porch! LOL

Rosemary trying to hide from everyone and lay an egg in peace


I know I've talked before on this blog about historic preservation and sustainability--and why the "greenest" building is the one that has already been built. If you missed this post, please click here to learn more.

Today I want to discuss ways in which the recent homesteading or "back to the land" movement can also be tied into the historic preservation movement (or at least, in my mind). Hopefully we can educate the throngs of people jumping onto the homesteading bandwagon about the merits of historic preservation and why it should be relevant to them!

So, here we go:

Historic farms and their siting/topography: most old farmsteads were sited in ways that maximized energy conservation and efficiency (winds, sun, access to water, etc.) For example, in the North Carolina mountains, early settlers positioned their homes often at the bottom of hillsides surrounded by mountainous terrain that offered protection from harsh winds, but high enough to be above the flood plane. A stream, creek or spring ran near the house most of the time, in order for a spring house to be placed upon it for easy access to water as well as a method of keeping dairy products cold.  Energy independence is a common theme/goal in today's homesteading community, and the farmsteads of yesteryear achieved this without even knowing it by the siting of their houses to best take advantage of the outside elements.  Many modern homesteaders are forgoing their dyers for outdoor line drying of clothes, hand-washing of dishes, and even weaning themselves from electricity.

 historic farmstead in Haywood County, NC


Some historic farmsteads retain their various but useful outbuildings which were meant for practical purposes: springhouses, smokehouses, bank barns, root cellars, poultry houses, corn cribs, livestock barns, etc. Some of these, such as a root cellar for example, can be extremely practical for the modern homesteader as it essentially preserves fall and winter root vegetables and squashes without the need for refrigeration. Already existing outbuildings from a historic farm reduces the need to build new, thus saving energy and money!

outbuildings in Haywood County, NC


Historic buildings themselves (until around the mid 20th century) were designed to be as energy efficient as possible without having air conditioning. The careful placement of windows, the use of fireplaces or wood stoves, and the materials used in construction were meant to last and aid in keeping the house cool in summer and warm in winter.

Many historic farms already have infrastructure in place for the keeping of animals (chickens, goats, turkeys, cattle, hogs, etc.) and often had a water source nearby.

Even through the first quarter of the twentieth century, some cities and many small towns allowed yards for the keeping of a small flock of poultry and a garden. Many cities are returning to this idea, with chicken ordinances allowing for a small flock of hens to be kept in the city limits. This is more difficult to attain in suburban neighborhoods with so many having homeowners association restrictions. Of course, historic districts too have local design guidelines but many downtowns are now allowing homeowners to keep a flock of hens in their backyard.

Both movements share a fundamental passion for saving and preserving old traditions, whether they be homesteading, gardening and farming traditions or traditional building patterns.

I'm not sure about you, but I think this connection between the homesteading and preservation movements is pretty darn cool!


Saturday, November 3, 2012

October-November Garden


You may not necessarily think of October or November as months for gardening, but there are several vegetables that can still be grown at this time of the year (especially in the South!).

One of the easiest ways to still get produce from your garden is to plan for succession planting.

Succession planting is where you can replant vegetables from earlier in the spring or summer to grow in the fall or even the winter, getting another growing season out of them each year. It maximizes the yields of your garden because you can plant small amounts of a single crop at different times throughout the year, ensuring a consistent supply spread throughout the year. It is probably wise to rotate the location of each crop. To learn more about succession planting, check out this article here.

sweet onion sets ready for planting

The fall months are also a good time for planting a variety of cold-weather or cold-tolerant plants, like collards, kale, swiss chard, some lettuces, broccoli, onions, garlic, peas, beets, and even radishes.

this bed is prepped for winter and planted with garlic, sweet onion, and red onion


onions are already sprouting from the soil

So far this fall we have planted more lettuce, garlic, onions, broccoli, snap peas, radishes, carrots, and a few other things. We also plan to plant kale, collards, and some other greens, which we may have to transplant to the cold frame if the temperatures drop to freezing. Unfortunately, the bed in which we planted the broccoli we neglected to protect with chicken wire, and ALL of the plants got eaten by the chickens!!! I was so mad at them.

a small bed planted with lettuce is finally getting closer to harvesting


My bean plants are still going strong and we are still getting a few peppers and southern peas!

pole beans


a couple day's worth of pole beans harvested, lots more pods still on the plants


For some reason root vegetables don't seem to grow well in our raised beds, so I'm not expecting them to produce much. It makes me sad, because I LOVE beets, carrots, turnips, parsnips, radishes and potatoes. We will try these again perhaps somewhere else in the garden and see if they do better. Do you have problems growing root vegetables? I can't figure out what our deal is-- but they do not like us!

A new activity we are trying with the garden this year is planting a cover crop of hairy vetch. I have no clue what this is but apparently it will help the soil throughout the winter in preparing for spring planting.

What does your fall garden look like? Do you plant a cover crop or allow you garden to go fallow?


Linking to: